Battery switch on travel trailer function is crucial for managing your RV’s power. Understanding how this simple yet vital component works is key to preventing electrical issues and ensuring a smooth camping experience. This guide breaks down everything you need to know, from different switch types and wiring diagrams to troubleshooting tips and essential safety precautions. We’ll explore how your battery switch interacts with other systems like solar panels and inverters, empowering you to confidently handle your RV’s electrical needs.
We’ll cover the basics of battery switch operation, delve into the intricacies of wiring and connections, and offer practical advice on maintenance and troubleshooting. By the end, you’ll have a comprehensive understanding of your travel trailer’s battery switch and be equipped to handle any challenges that arise.
Understanding Battery Switch Functionality in Travel Trailers
Your travel trailer’s battery switch is a crucial component, acting as the central control for your trailer’s power system. It allows you to disconnect your house batteries from the rest of the electrical system, preventing battery drain when the trailer isn’t in use and protecting your sensitive electronics from power surges. Understanding its function and proper operation is key to maintaining your trailer’s electrical system and extending the life of your batteries.
Battery Switch Types
Travel trailers typically utilize one of several types of battery switches. The choice depends on the complexity of the electrical system and the level of control desired. Common types include the simple 1-2-Both-Off switch, single-pole switches, and double-pole switches. A 1-2-Both-Off switch offers basic control, selecting either battery 1, battery 2, both batteries, or disconnecting both completely.
So, you’re an audiophile who travels? Awesome! Check out this guide on audiophile travel setups to make sure your ears are happy on the road. Knowing how to manage your power is also key, especially if you’re in a travel trailer. Understanding the battery switch on travel trailer function will save you headaches (and dead batteries!).
Proper power management is crucial for both your audio enjoyment and your overall off-grid experience.
Single-pole switches control only one side of the battery circuit (positive or negative), while double-pole switches control both sides, providing a more complete isolation.
Operating a Typical Battery Switch
Proper operation of your battery switch is essential for safety and efficient power management. A typical 1-2-Both-Off switch usually has a rotary handle or lever. Before operating the switch, ensure the power to the trailer is turned off at the main breaker panel.
- Identify the switch positions: Locate the switch markings indicating “Battery 1,” “Battery 2,” “Both,” and “Off.”
- Select the desired position: Rotate the switch handle to the position that matches your needs. “Off” completely disconnects the batteries. “Battery 1” connects only the first battery. “Battery 2” connects only the second battery. “Both” connects both batteries in parallel.
- Verify the connection: After switching, briefly check the trailer’s electrical system to ensure power is on or off as expected.
Remember to always consult your trailer’s owner’s manual for specific instructions and diagrams.
Comparison of Battery Switch Types
The table below compares the advantages and disadvantages of different battery switch types. The best choice depends on your specific needs and the complexity of your trailer’s electrical system.
| Switch Type | Advantages | Disadvantages | Typical Use Cases |
|---|---|---|---|
| 1-2-Both-Off | Simple operation, cost-effective | Limited control, may not offer complete isolation | Basic trailers with two batteries |
| Single-Pole | Relatively simple, less expensive than double-pole | Only isolates one side of the circuit, may not fully protect electronics | Simpler systems, may be used in conjunction with other safety devices |
| Double-Pole | Provides complete isolation, better protection for electronics | More complex, more expensive | Trailers with complex electrical systems, multiple appliances |
Battery Switch Wiring and Connections
Understanding how your battery switch is wired is crucial for safe and reliable power in your travel trailer. This section details the typical wiring configuration, connection points, and the role of safety devices. Improper wiring can lead to dangerous situations, so careful attention to detail is essential.
The typical wiring configuration for a battery switch in a travel trailer involves connecting the switch between the house batteries and the trailer’s electrical system. A separate connection exists for the chassis battery, which powers essential functions like the brakes and lights, and usually remains independent of the house battery system.
Battery Switch Connection Points
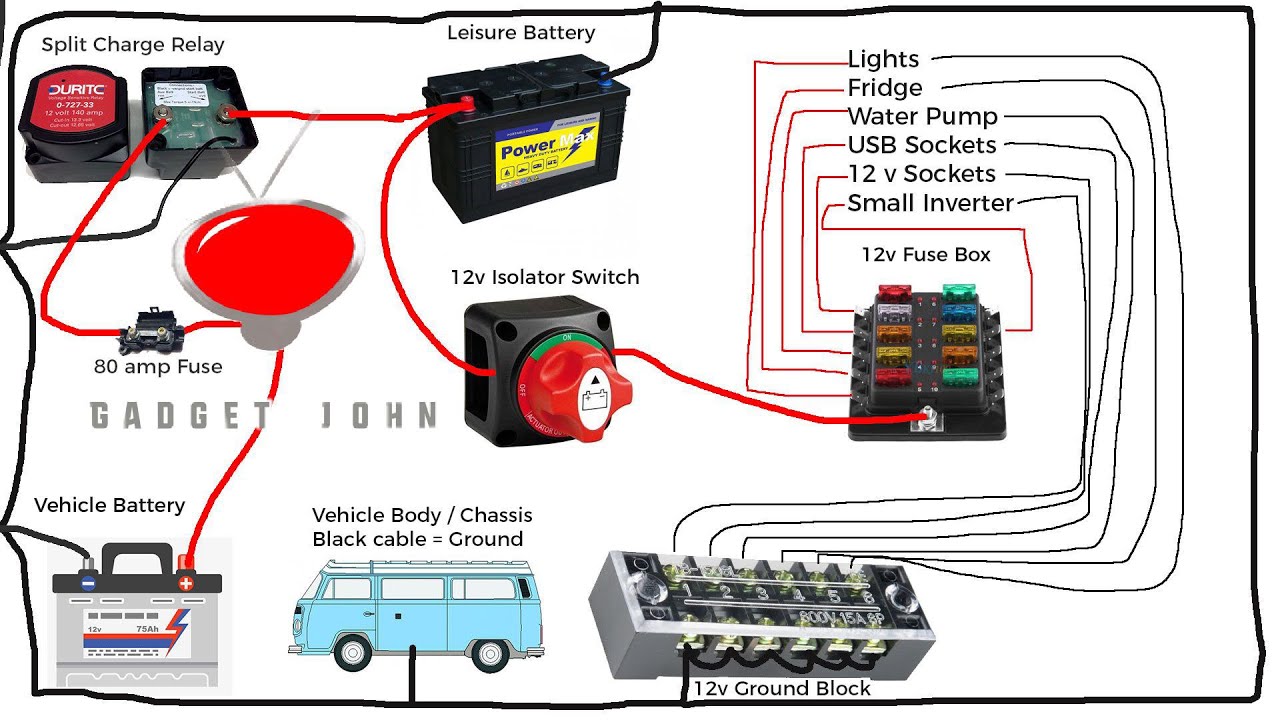
Imagine a diagram. The battery switch sits centrally. On one side, you have the positive (+) and negative (-) terminals of your house battery bank (typically two 12V batteries wired in parallel). Thick gauge wires (at least 4 gauge, but often thicker depending on battery capacity) run from the battery bank’s positive and negative terminals to the corresponding positive and negative terminals on the battery switch.
On the other side of the switch, similar thick wires connect the switch’s output terminals to the positive and negative bus bars of your trailer’s 12V electrical system. These bus bars then distribute power to various appliances and systems within the trailer.
Separately, the chassis battery (typically located near the tongue) is connected directly to the trailer’s chassis wiring. This connection bypasses the battery switch. The chassis battery powers the trailer’s lights, brakes, and other safety-critical systems, ensuring they function even when the house batteries are disconnected.
Fuses and Circuit Breakers
Safety is paramount in any electrical system. Fuses and circuit breakers protect your wiring and equipment from damage caused by overloads or short circuits. In a typical setup, you’ll find a large fuse (often an ANL fuse) protecting the main positive wire leading from the house batteries to the switch. The size of this fuse depends on the amperage capacity of the wiring and batteries.
Additional fuses or circuit breakers will protect individual circuits branching off from the battery switch’s output.
Circuit breakers offer the added advantage of being resettable, unlike fuses, which must be replaced after blowing. A properly sized circuit breaker will trip before excessive current damages the wiring or appliances.
Potential Wiring Issues and Troubleshooting
Several issues can arise with battery switch wiring. Loose connections are a common culprit, leading to intermittent power or complete failure. Corrosion on terminals can also increase resistance and create heat, potentially causing fires. A blown fuse or tripped circuit breaker indicates an overload or short circuit somewhere in the system. This requires careful investigation to identify and fix the root cause, such as a faulty appliance or damaged wiring.
Troubleshooting involves systematically checking connections for tightness and corrosion, inspecting fuses and circuit breakers, and testing individual circuits to pinpoint the problem area. A multimeter is an invaluable tool for this process, allowing you to measure voltage and current to identify faulty components or wiring.
Battery Switch Maintenance and Troubleshooting
Keeping your travel trailer’s battery switch in good working order is crucial for reliable power. Neglecting maintenance can lead to frustrating breakdowns and potentially damage your batteries. Regular checks and preventative measures will ensure smooth operation and extend the lifespan of your switch.Regular Maintenance Schedule for a Travel Trailer Battery SwitchA simple maintenance schedule can significantly improve the longevity and performance of your battery switch.
It’s not overly complicated, and the time investment is minimal, but the rewards are substantial.
Inspection and Cleaning
Regular visual inspections are key. At least once a year, or more frequently if you use your trailer extensively in harsh conditions, carefully examine the battery switch for signs of corrosion, loose connections, or damage. Corrosion, often appearing as a white or green powdery substance, can hinder electrical conductivity and lead to poor performance. Loose connections can cause intermittent power loss or complete failure.
Pay close attention to the terminals and wiring harness. Use a wire brush to remove any corrosion, and ensure all connections are tight. A small amount of dielectric grease applied to the terminals after cleaning will help prevent future corrosion.
Tightening Connections
Over time, vibrations during travel can loosen connections. Check the tightness of all terminal connections on the battery switch. Use the correct size wrench to ensure you don’t over-tighten and damage the terminals. If connections are loose, tighten them securely. If you notice any damage to the terminals, it’s best to replace them.
Common Battery Switch Problems
Several common issues can affect your travel trailer’s battery switch. These issues often stem from neglect or exposure to the elements.
Corrosion
Corrosion is a major culprit. Moisture, especially in humid environments or near saltwater, accelerates corrosion. This buildup of corrosive material on the terminals creates resistance, hindering the flow of electricity. In severe cases, corrosion can completely block the current, leaving you without power. The visual cue is typically a white, green, or blue powdery substance around the terminals and connections.
Loose Connections
Vibrations from towing can loosen connections over time. This can result in intermittent power or complete power failure. A loose connection may not always be visually apparent; you might need to wiggle the wires gently to detect any movement.
Solutions for Resolving Common Battery Switch Problems
Addressing common problems promptly is vital. Ignoring these issues can lead to more significant problems, potentially damaging your batteries or other electrical components.
Corrosion Removal
Clean the corroded terminals using a wire brush, a small file, or a specialized battery terminal cleaner. After cleaning, apply a dielectric grease to the terminals to prevent future corrosion. If the corrosion is severe and has damaged the terminals, replacement is necessary.
Tightening Loose Connections
Carefully tighten any loose connections. Ensure that the connections are secure but not over-tightened. If the terminals are damaged or worn, replace them.
Preventing Future Battery Switch Issues
Preventative measures are key to maintaining a reliable battery switch.
Regular Cleaning
Regularly clean the battery switch and terminals to prevent corrosion. A simple wipe-down with a damp cloth can make a significant difference.
Use of Dielectric Grease
Applying dielectric grease to the terminals after cleaning helps prevent future corrosion by repelling moisture.
Proper Wiring
Ensure all wiring is properly secured and protected from moisture. Consider using waterproof connectors where appropriate.
Regular Inspection
Regularly inspect the battery switch for signs of wear, damage, or corrosion. Early detection can prevent major problems.
Battery Switch and Electrical System Integration
Your travel trailer’s battery switch is the central control point for your 12-volt DC electrical system. Understanding its role in the larger electrical scheme is crucial for safe and efficient operation. This section details the battery switch’s interaction with other components and Artikels procedures for safe disconnection and replacement.The battery switch acts as a master on/off switch for your trailer’s house batteries.
It dictates the flow of power from the batteries to various appliances and systems. When the switch is in the “off” position, it completely isolates the batteries, preventing accidental discharge or short circuits. In the “on” position, it allows power to flow, energizing everything from lights and water pumps to refrigerators and air conditioners (depending on your setup).
This simple yet powerful control is essential for managing your trailer’s power consumption and preventing battery drain.
Interaction with Inverters
Inverters convert 12-volt DC power from your batteries into 120-volt AC power, allowing you to run household appliances. The battery switch controls the DC power source for the inverter. Therefore, turning the battery switch off will shut down the inverter and any AC-powered devices connected to it. A properly wired system will prevent the inverter from drawing power when the battery switch is off, protecting your batteries from unnecessary drain.
For example, a 1000-watt inverter might draw around 80 amps at full load. If the battery switch isn’t turned off, this continuous draw could quickly deplete your batteries even if nothing is plugged into the inverter’s AC outlets.
So, you’re an audiophile who loves to travel? Awesome! Check out this guide on audiophile travel setups to make sure your music sounds amazing on the road. Then, if you’re hitting the road in an RV, understanding the battery switch on travel trailer function is crucial for keeping your lights and entertainment running smoothly.
Knowing how to manage your power is just as important as having killer tunes!
Interaction with Solar Panels
Solar panels charge your batteries, providing an alternative power source. The interaction between the battery switch and solar panels depends on your system’s configuration. In some setups, the solar charge controller is wired directly to the batteries, bypassing the battery switch. This means your batteries will still charge even with the battery switch off. In other systems, the charge controller may be wired downstream of the battery switch, meaning the switch needs to be on for the panels to charge the batteries.
Always consult your trailer’s wiring diagram to determine how your specific system is configured. A typical example of a bypassed system is where the solar charge controller uses a separate, dedicated charging circuit to the batteries. This is common with larger solar installations.
Safely Disconnecting the Battery Switch for Maintenance or Storage
Before performing any maintenance on your battery switch or storing your trailer for an extended period, always disconnect the battery switch. This prevents accidental shorts or discharges.
- Turn off all appliances and electronics connected to the trailer’s 12-volt system.
- Locate the battery switch and turn it to the “off” position.
- Visually inspect the switch and its wiring for any signs of damage or corrosion.
- If performing maintenance, disconnect the wires from the switch terminals. Remember to label the wires before disconnecting them to ensure correct reconnection.
- After maintenance or before long-term storage, reconnect the wires if necessary, ensuring they are securely fastened.
- Turn the battery switch to the “on” position and verify that all systems are functioning correctly.
Upgrading or Replacing a Battery Switch, Battery switch on travel trailer function
Upgrading or replacing your battery switch is a straightforward process, but safety precautions are crucial. Always disconnect the batteries before starting any work.
- Disconnect the negative (-) battery cable from your house batteries. This is the most important safety step.
- Disconnect the wires from the old battery switch, carefully noting their positions and connections.
- Remove the old battery switch from its mounting location.
- Mount the new battery switch in the same location, ensuring secure fastening.
- Reconnect the wires to the new switch, matching them to their original positions. Double-check all connections for tightness.
- Reconnect the negative (-) battery cable to the house batteries.
- Test all systems to ensure proper operation.
Safety Precautions and Best Practices

Working with your travel trailer’s battery system requires careful attention to safety. Improper handling can lead to serious injury from electrical shock, burns, or explosions. This section Artikels essential safety precautions and best practices to ensure a safe and efficient experience.
Always prioritize safety when dealing with batteries and electrical systems. A little preparation goes a long way in preventing accidents and ensuring the longevity of your equipment.
Battery Switch Safety Checklist
Before you begin any work on your battery switch, complete this checklist. This methodical approach minimizes risks and ensures a smooth process.
- Turn off all appliances and electronics connected to the battery system.
- Wear safety glasses to protect your eyes from potential splashes of battery acid.
- Wear gloves to protect your hands from acid and potential cuts.
- Ensure adequate ventilation to avoid inhaling potentially harmful gases produced by batteries.
- Have a fire extinguisher nearby, rated for electrical fires (Class C).
- Have baking soda or another neutralizing agent on hand in case of battery acid spills.
- Work in a well-lit area to improve visibility and reduce the risk of accidents.
Connecting and Disconnecting Batteries
Proper connection and disconnection procedures are crucial for preventing sparks and damage to your equipment. Follow these steps to ensure safety.
- Always disconnect the negative (-) terminal first when removing a battery from the circuit. This minimizes the risk of accidental short circuits.
- When connecting a battery, always connect the positive (+) terminal last. This prevents accidental short circuits.
- Use appropriate tools – properly sized wrenches to avoid damaging the battery terminals.
- Clean battery terminals with a wire brush before connecting or disconnecting. Corrosion can impede connections and create resistance, leading to heat buildup.
- Ensure all connections are tight and secure to prevent loose connections that can cause sparks or overheating.
Hazards of Improper Battery Switch Use
Ignoring safety procedures can result in several hazards. Understanding these potential dangers is essential for safe operation.
- Electrical Shock: Improper handling can lead to severe electrical shock, potentially fatal.
- Burns: Overheating due to loose connections or corrosion can cause burns from hot wires or battery terminals.
- Battery Explosions: Sparks near battery terminals can ignite flammable gases produced by batteries, leading to explosions.
- Acid Burns: Spilled battery acid can cause severe chemical burns to skin and eyes.
- System Damage: Improper connections can damage your battery switch, wiring, and other electrical components.
Extending Battery Switch Lifespan
Proper maintenance significantly extends the lifespan of your battery switch and related components.
- Regularly inspect the battery switch for corrosion and loose connections. Clean terminals as needed.
- Use a battery disconnect switch cover to protect the switch from the elements and accidental activation.
- Avoid overloading the system. Ensure your battery capacity is sufficient for your appliances.
- Use a battery maintainer to prevent deep discharge and extend battery life, which reduces stress on the switch.
- Periodically check all wiring for damage and replace any frayed or damaged wires.
Mastering your travel trailer’s battery switch is about more than just flipping a switch; it’s about understanding your RV’s electrical system and ensuring safe and reliable power. From choosing the right switch type to performing routine maintenance, the knowledge gained here will save you time, money, and potential headaches down the road. Remember to always prioritize safety and consult a professional if you encounter any complex issues.
Happy travels!
FAQ Insights: Battery Switch On Travel Trailer Function
What happens if I leave my battery switch in the “off” position?
Leaving the switch off completely disconnects both your house and chassis batteries, preventing any power draw and protecting against accidental discharge. However, this also means no power to your appliances or lights.
Can I use a different type of battery switch than what came with my RV?
Yes, but it’s crucial to choose a switch with the correct amperage rating for your battery system and to ensure proper wiring. Consult an electrician if unsure.
How often should I inspect my battery switch for corrosion?
Ideally, inspect your battery switch at least once a year, or more frequently if you live in a humid climate or frequently use your RV.
My battery switch feels hot to the touch. Is this normal?
No, a hot battery switch indicates a problem, likely a loose connection or high amperage draw. Turn off the switch immediately and investigate the issue.
